How Do I Install Span Track?
While span track is one of the easier gravity flow racks to install, this span track installation guidecan help make the job “flow” as smooth as possible.
1. Installing Pallet Rack Beams at the Proper Pitch
Whether you are installing high profile, low profile or deck span track, pitch of the track is the key requirement to consider. All span track installations start with setting the pallet rack beams to the proper height. Remember, after you've installed the first run of track, test the pitch before installing further tracks.
Start by installing the front pallet rack beam to your required pick elevation. Using the chart below as an approximate pitch guide, install rear beam at higher elevation. Pitch per foot means that for each foot of pallet rack depth, install the rear beam that much higher than the front beam. For example, assume that we are installing track for 10 lb. cartons on 4' deep pallet rack.
According to the chart, this product would necessitate us installing the rear beam 1″ per foot higher than the front beam, or 4″ higher. Pitch requirements may vary based on product type, weight and firmness against the track and should always be tested.

| Product | Pitch Per Foot |
| 1 lb. to 10 lb. Cartons | 1″ to 1-1/8″ |
| 10 lb. to 30 lb. Cartons | 7/8″ to 1″ |
| 30 lb. to 60 lb. Cartons | 3/4″ to 7/8″ |
| Totes | 3/4″ to 7/8″ |
2a. Installing High Profile Span Track
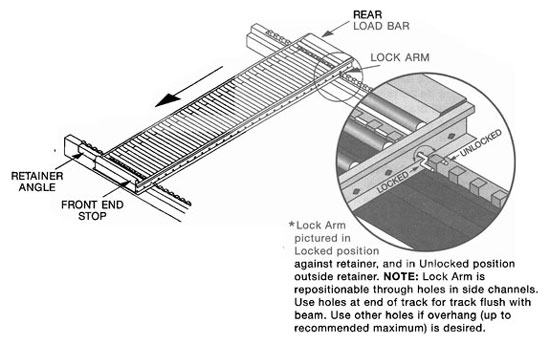
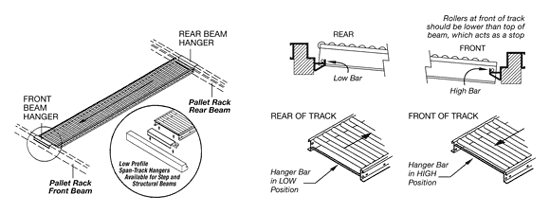
High Profile Span Track installs on pallet rack beams and does not require hangers. Place high profile span track on beams. Adjust front-to-back for desired overhang and position. Adjust left-to-right to accommodate product size.
Tracks may be tech screwed to beams to keep them from migrating. Retainer angles/strips can also be mounted on beam tops to keep track from sliding or moving.
2b. Installing Low Profile Span Track
Low profile span track installs between pallet rack beams either in hangers or in beam steps. When using hangers, place one hanger on front beam and one on rear beam, being careful not to force or hammer into place.
Remember the rear/input end of the span track has a “low hanger bar” hang rod. The front/pick end of the span track has a “high hanger bar” hang rod. Place proper track hang rods in position on hangers.
2c. Installing Deck Span Track
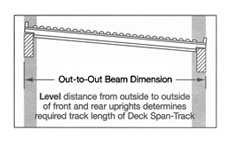
Deck span track drops into any single deep pallet rack at standard depths (36″, 42″, 48″, 54″). Hangers for this style are optional. When installing deck span track, remember the length of the track must equal level out-to-out beam distance. Place deck span track on pallet rack beams.
3. Testing the Flow
Load the installed span track with one carton of product. Observe product flow and adjust pitch as necessary. For a final test, fully load span track lane with product and let sit for 24 hours. Remove one or two cartons from the front/pick end and check product flow. Readjust the pitch as necessary.
